Water Droplets in Houdini

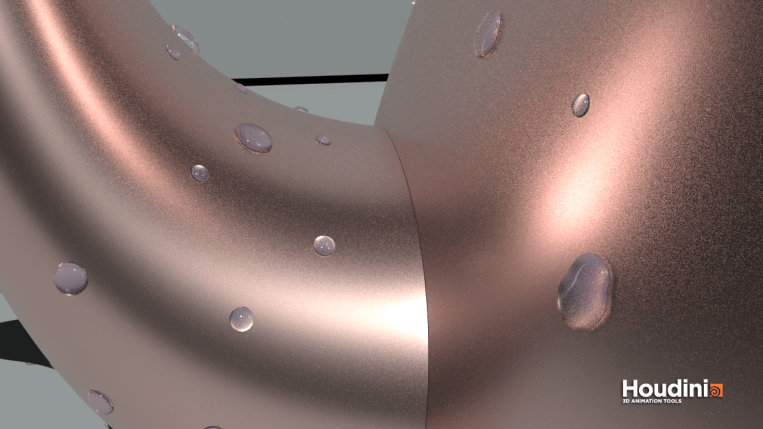
This week I learned more about working with VOPs in Houdini – a powerful tool to manipulate point attributes. Using this we can create water droplets on a surface by tweaking attributes of scattered points of the surface geometry . Attributes such as position, normals, colour and other custom attributes.

glass

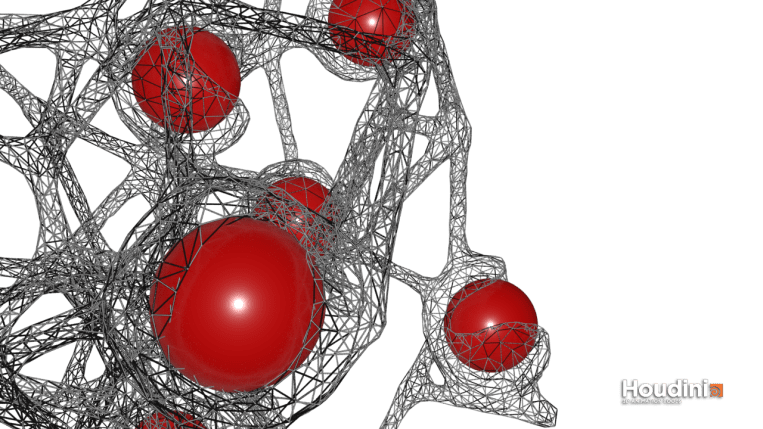
To create the water droplets we will basically scatter points of a geometry on which we want to create the droplets. Using copy to points node we can copy tiny spheres to replace the points. To make the spheres look like droplets we are going to add smaller spheres on top of each sphere, combine them and then smoothen them out. This is where we will be heavily relying on point VOP nodes.

  1. To create a pscale for the spheres. Using a simple noise function we can assign random sizes to the spheres.
  2. To create smaller spheres on top and move them along the surface upward. This can be achieved using vector functions.
    • Cross product between each point’s global y direction and it’s normal
    • Cross product between the resulting vector and the point’s normal
  3. Displace the smaller spheres on top by moving the new vector a little away from old points.

Had so much fun just rendering with different geometries and scatter amounts.


kettle_highres

Denting and abstract geometry in Houdini

abs
Attach the abstract geometry and perform wireframe edit before merging the two geometries to get this result

I watched this amazing tutorial on volume boolean denting (link) using boolean functions on Volumes in Houdini. We’re essentially converting two geometries in their polygon forms to volumetric forms (voxels) and perform boolean difference and intersection before finally merging them.

I will be sharing the node network in this post and also describe each step to make it easier to understand

  1. Create two geometries – usually the bigger polygon will be dented with a smaller one
  2. Convert the polygons into volumes by using the VDB from polygons node
  3. Use the VDB Reshape node to expand both the volumes slightly before performing boolean difference. This will help create a bulge where the dent is formed.
  4. Use the VDB Combine node to combine both the expanded volumes using SDF Intersection function
  5. Now remove the smaller volume(before expansion) from the expanded one using VDB Combine and choosing the SDF Difference function
  6. Remove the smaller volume from the bigger one using the same VDB Combine node and SDF difference function
  7. Combine the last two nodes using SDF Intersection
  8. Smooth the volume using VDB Smooth
  9. Convert the resulting volume back to polygons using Convert VDB node
  10. Merge the original small sphere with the final polygon mesh to make it visible

Dent


Node set up for the abstract geometry is pretty simple:

abs.PNG

Voronoi fracture using Houdini

So, looks like I’m in love with Houdini, as I am spending a lot of effort on Houdini projects. I took up some tutorials on digital tutors and learnt the art of fracturing in Houdini.

Off the shelf tools are so handy to use if you want to create a scene with a simple breakable object but there’s a lot more for us to learn about the fracture dynamics building blocks.

untitled1

So I used a box geometry with wood material. The fracture parts are amde to looks long and sharp by adding a transform node after the fracture node. So the pieces are scaled along the y axis to look more realistic as like wooden shards.

Here’s the screenshot of my Box SOP network

Houdini file

The voronoi fracture points node is especially useful to create desired fracture points input from the scatter node.

For the rendering I have used environment light and a sampling quality of 20.